Website Support
Get help with our website, creating posts, and looking after the site.
Support
The Association is working hard to help make a difference in the Kensington community. To help the committee members in using this website, these simple tutorials have been created to guide the committee members through the key processes of maintaining the health of their site and also how to post new articles, newsletters, meetings, photos, and other helpful information to help their community prosper.
General
In this guide, we will walk you through on how to access the KA website and navigate around the admin dashboard.
Logging In
Log in to the KA WordPress Administrator Dashboard Screen
Navigate to the ‘KA Website’ using the following link:
- Click or copy and paste the link into the browser address bar:
- Enter your administrator credentials (KA email address and password provided to you).
- Click the ‘Log In’ button.

Once logged in, you will be presented with the ‘Dashboard’ screen.

CONGRATULATIONS, you have now logged into the KA WordPress Administrator Dashboard Screen.
Logging Out
Log out of the KA WordPress Administrator Dashboard Screen
Within the ‘KA WordPress Administrator Dashboard Screen’:
- Hover the mouse over the ‘Logged In User’ (in this example, the KA Admin).
- Click the ‘Log Out’ button.

Once logged out, you will be presented with the ‘Log In’ screen.

CONGRATULATIONS, you have now logged out of the KA WordPress Administrator Dashboard Screen.
Dashboard
Navigating the KA WordPress Administrator Dashboard Screen
The ‘KA WordPress Administrator Dashboard Screen’ is your starting point to access the key aspects of the site, including:
- Logged in user.
- Posts tab.
- Media (photos, videos, documents, etc.) tab.
- Comments tab (with indicator of how many unread comments).
- Pages tab (admin use only).
- Activity on the site (recently published posts, recent comments, etc.).
Please take the time to familiarise yourself with the different tabs, areas and section. Click on each to view the related content.
CONGRATULATIONS, you have now familiarised yourself with the KA WordPress Administrator Dashboard Screen.
Content
In this guide, we will walk you through on how to manage the content for the KA website, managing media (photos, videos, documents, etc.), selecting the right post template and manage posts.
Please Note: To complete these sections, you must have either ‘CONTRIBUTOR, AUTHOR, EDITOR or ADMINISTRATOR‘ access assigned to your user account. If you believe you should have these user account privileges, please contact your ‘WEBSITE ADMINISTRATOR’.
Media (Photos, Videos, Documents, Etc.)
Please Note: To complete these sections, you must have either ‘CONTRIBUTOR, AUTHOR, EDITOR or ADMINISTRATOR‘ access assigned to your user account. If you believe you should have these user account privileges, please contact your ‘WEBSITE ADMINISTRATOR’.
Managing Media through the Dashboard Media Screen
Navigate to the ‘Media’ tab:
- Click the ‘Media’ link on the right hand side panel.

Finding Existing Media
To find existing media (photos, videos, documents, etc.) to be used in ‘Posts’:
- Click the ‘Search’ techbox.
- Enter ‘Keyword(s)’ related to the media file(s) title or file name to find them.
- Press the ‘Enter Key’.
- The relevant media file(s) will be display.
- Adjust ‘Keysword(s)’ until you find your desired media file(s).

Adding New Media
To add new media (photos, videos, documents, etc.) to be used in ‘Posts’:
- Click the ‘Add New’ button, a new ‘Drop files to upload’ panel will appear.
- To ‘Drag and Drop’ media file(s) from your computer or the internet:
- Navigate to the media file(s).
- Select the media file(s) to add.
- Drag the media file(s) over to the ‘Drop files to upload’ panel.
- Drop the media file(s) into the ‘Drop files to upload’ panel.
- To use the ‘Select Files’ button to upload media file(s) from your computer:
- Click the ‘Select Files’ button to open the ‘File Browser Screen’.
- Navigate to the folder of the media file(s).
- Select the media file(s).
- Click the ‘Open’ button.
- The media file(s) will commence uploading and display a progress bar.
- Once the progress bar is completed, the media file(s) are ready to use.


Deleting Media
To delete existing media (photos, videos, documents, etc.):
Please Note: Before DELETING ANY MEDIA FILE, please ensure they are not currently being used in any ‘Posts’ or ‘Pages’ throughout the ‘KA Website’. Once media file(s) have been permanently delete, they cannot be retrieved and will need to be upload again.
- To delete a ‘Single’ media file:
- Click the ‘Media File’ to open the file in the ‘Attachment Details’ panel.
- Click the ‘Delete Permanently’ link.
- To ‘Bulk’ delete media file(s):
- Click the ‘Bulk Select’ button.
- Select the media file(s) to delete.
- Click the ‘Delete Permanently’ button.
- Confirm you want to permanently delete the media file(s).
- The media file(s) will be deleted and will no longer be visible.


CONGRATULATIONS, you have now familiarised yourself with the KA Website Media, how to manage, find, add and delete media file(s).
Post Templates
Please Note: To complete these sections, you must have either ‘CONTRIBUTOR, AUTHOR, EDITOR or ADMINISTRATOR‘ access assigned to your user account. If you believe you should have these user account privileges, please contact your ‘WEBSITE ADMINISTRATOR’.
Understanding the different 'POST TEMPLATES'
Multiple ‘POST TEMPLATES‘ have been created to assist you in adding content to the ‘KA Website’. These ‘POST TEMPLATES‘ also serve as means to maintain a ‘POST STANDARD‘ look and feel for your posts which will help users by providing a consistent and standardised format for them to view and interact with your posts, no matter which admin user creates them.
To determine the type of post to create, first determine which location you wish the post to be displayed. The available ‘POST TEMPLATES‘ include:
- Activities
- News Items
- Newsletters
- Meetings
- Minutes
- Events
- Testimonials
- Suburb Characteristics
- Suburb Facts
- Roadmap
- Constitution
Please Note: Post Name (or the Technical Name) and Post Title represents two different things. Post Name: Refers to the technical name of the post, seen only by internal admin, creator and editor users of the website posts. Post Title: Refers to the title of the post, seen by external users of the website posts.
- ACTIVITIES:
- Represents: Current and past activities, campaigns and projects the Association is working on or has worked on in the past.
- Example: Building, business, street, traffic, etc.
- Location:
- Page: Home (current only)
- Section: See What’s Happening
- Page: Activities
- Section:
- Community Issues = Current Activities
- Past Campaigns = Past Activities.
- Page: Home (current only)
- Template: _TEMPLATE_ACTIVITIES
- Naming Standard: ACTIVITY: [LOCATION / SUBURB / STREET] [SHORT TITLE OF ACTIVITY]
- Naming Example: ACTIVITY: Kensington YoungHusband
- Represents: Current and past activities, campaigns and projects the Association is working on or has worked on in the past.
- NEWS ITEM / NEWSLETTERS:
- Represents: Current and past news items happening in the community, state, country, etc. (which are not activities or related to activities) or newsletters from the association.
- Example: Council relevant news, suburb relevant news, etc.
- Location:
- Page: News
- Section: Latest News
- Page: News
- Template: _TEMPLATE_NEWS_NEWS
- Naming Standard: NEWS: [LOCATION] [SHORT TITLE OF NEWS ITEM]
- Naming Example: NEWS: Melbourne Easter Dates
- Template: _TEMPLATE_NEWS_NEWSLETTER
- Naming Standard: NEWSLETTER: [YYYY/MM/DD] [SHORT TITLE OF NEWSLETTER]
- Naming Example: NEWSLETTER: 2020/02/03 February Monthly Newsletter
- Represents: Current and past news items happening in the community, state, country, etc. (which are not activities or related to activities) or newsletters from the association.
- MEETINGS / MINUTES:
- Represents: Current and past meetings held by the association and the relevant minutes.
- Example: Monthly meeting, minutes from monthly meeting, etc.
- Location:
- Page: News
- Section: Meetings & Minutes
- Page: News
- Template: _TEMPLATE_NEWS_MEETINGS
- Naming Standard: MEETING: [YYYY/MM/DD] [SHORT TITLE OF MEETING]
- Naming Example: MEETING: 2020/02/03 February Monthly Meeting
- Template: _TEMPLATE_NEWS_MINUTES
- Naming Standard: MINUTES: [YYYY/MM/DD] [SHORT TITLE OF MINUTES]
- Naming Example: MINUTES: 2020/02/03 February Monthly Meeting Minutes
- Represents: Current and past meetings held by the association and the relevant minutes.
- EVENTS:
- Represents: Current and past events held by the association.
- Example: Kensington Community Festival, etc.
- Location:
- Page: News
- Section: Upcoming Events
- Page: News
- Template: _TEMPLATE_NEWS_EVENT
- Naming Standard: EVENT: [YYYY/MM/DD] [LOCATION / SUBURB / STREET] [SHORT TITLE OF EVENT]
- Naming Example: EVENT: 2020/03/29 JJ Holland Park Kensington CommUNITY Festival
- Represents: Current and past events held by the association.
- TESTIMONIALS:
- Represents: Testimonial provided by members, supporters, etc.,
- Example: Testimonial for YoungHusband development support, etc.
- Location:
- Page: Home
- Section: What Our Community Says About Us
- Page: Join
- Section: Our Testimonials
- Page: Home
- Template: _TEMPLATE_JOIN_TESTIMONIAL
- Naming Standard: TESTIMONIAL: [YYYY/MM/DD] [SHORT TITLE OF TESTIMONIAL]
- Naming Example: TESTIMONIAL: 20200101 YoungHusband – John Smith
- Represents: Testimonial provided by members, supporters, etc.,
- SUBURB CHARACTERISTICS:
- Represents: Characteristics and traits of the suburb,
- Example: Size, boarders, population, history, etc.
- Location:
- Page: Our Community
- Section: Suburb Characteristics
- Page: Our Community
- Template: _TEMPLATE_COMMUNITY_CHARACTERISTICS
- Naming Standard: CHARACTERISTIC: [CHARACTERISTIC] [SHORT TITLE OF CHARACTERISTIC]
- Naming Example: CHARACTERISTIC: Kensington Population As of 2020
- Represents: Characteristics and traits of the suburb,
- SUBURB FACTS:
- Represents: Facts and history of the suburb,
- Example: History, Historical events, places, Key events, places, etc.
- Location:
- Page: Our Community
- Section: Suburb Facts
- Page: Our Community
- Template: _TEMPLATE_COMMUNITY_FACTS
- Naming Standard: FACT: [FACT] [SHORT TITLE OF FACT]
- Naming Example: FACT: Kensington Historical Stockyard Route
- Represents: Facts and history of the suburb,
- ROADMAP:
- Represents: The roadmap, milestones, historical achievements, next steps for the Association,
- Example: Vision for the current year, accomplishments fro previous years, etc.
- Location:
- Page: About
- Section: Our Roadmap
- Page: About
- Template: _TEMPLATE_ABOUT_ROADMAP
- Naming Standard: ROADMAP: [YYYY/MM/DD] [SHORT TITLE OF ROADMAP]
- Naming Example: ROADMAP: 20200101 Kensington Association 2020 Vision
- Represents: The roadmap, milestones, historical achievements, next steps for the Association,
- CONSTITUTION:
- Represents: The constitution which the Association operates by,
- Example: Constitution key points, etc.
- Location:
- Page: About
- Section: Our Constitution
- Page: About
- Template: _TEMPLATE_ABOUT_CONSTITUTION
- Naming Standard: CONSTITUTION: [YYYY/MM/DD] [SHORT TITLE OF CONSTITUTION]
- Naming Example: CONSTITUTION: 20200101 Kensington Association 2020 Constitution
- Represents: The constitution which the Association operates by,
Managing Posts through the Dashboard Media Screen
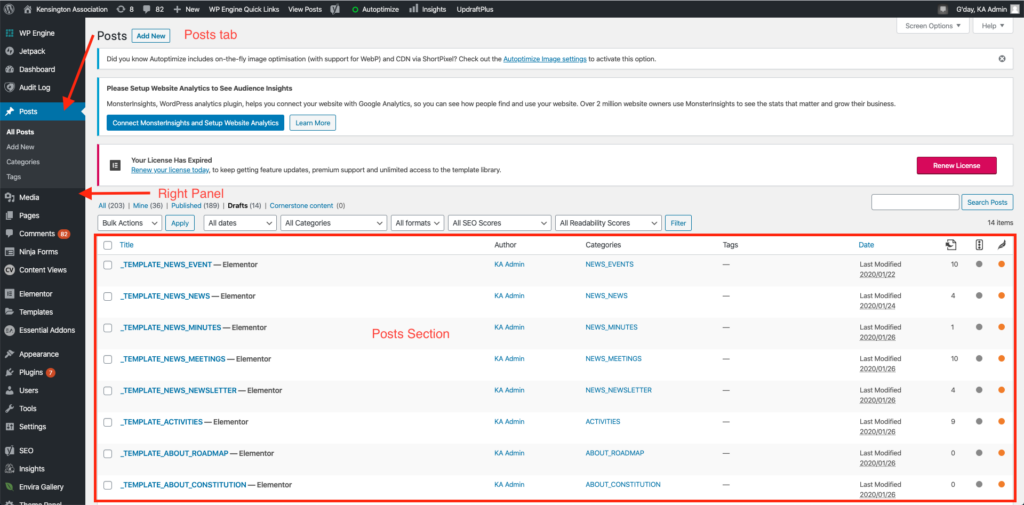
Navigate to the ‘Posts’ tab:
- Click the ‘Posts’ link on the right hand side panel.
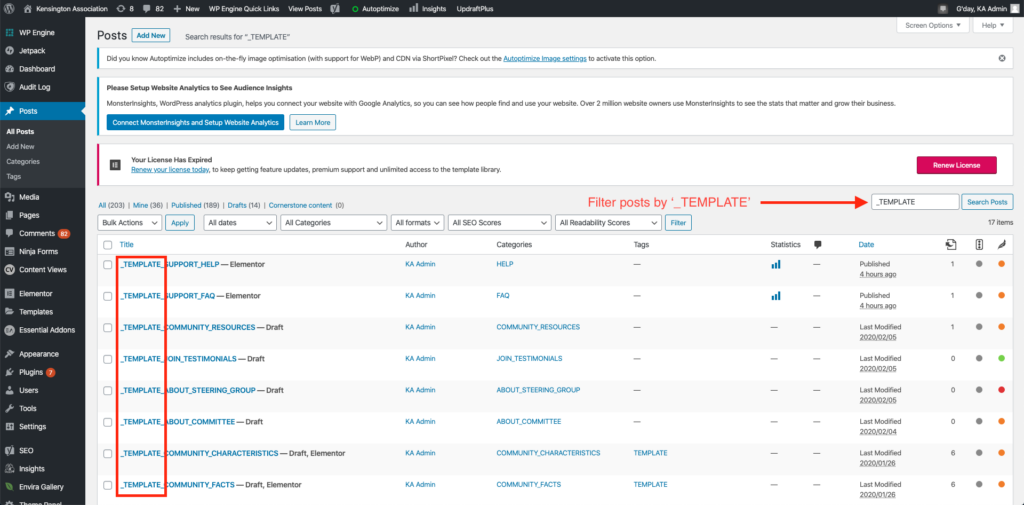
Finding the right 'POST TEMPLATE' to use
Narrow down the posts list to only filter by the ‘POST TEMPLATES‘ posts:
- Click the ‘Search Posts’ textbox.
- Enter the search keyword ‘_TEMPLATE’ to display all the posts with that keyword in the name or title.
- Click on the ‘Search Posts’ button.
- Identify the desired post type ‘POST TEMPLATE‘ required by matching the required post to the post type template name, e.g. to create an ‘EVENTS’ post you need the ‘_TEMPLATE_NEWS_EVENT’ template.
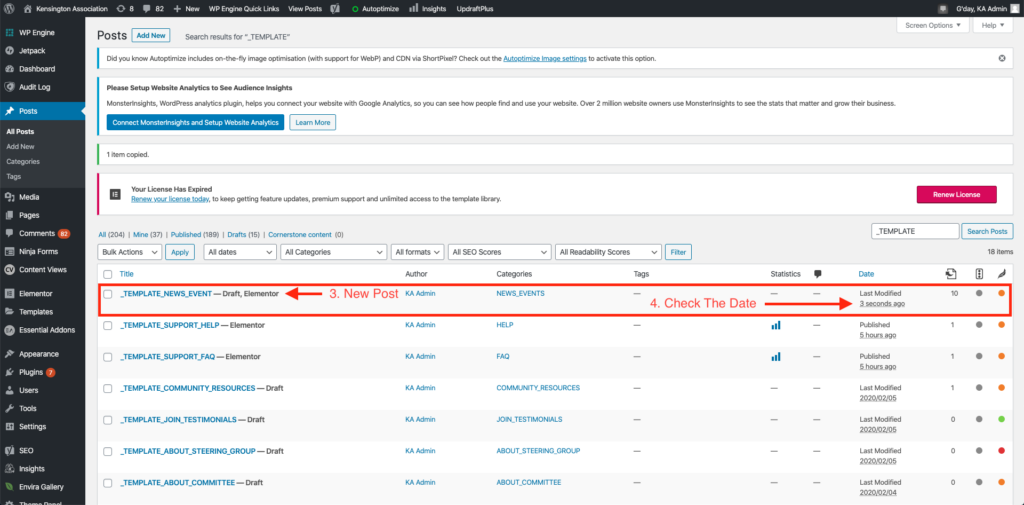
Copying / cloning a new draft version of the 'POST TEMPLATE'
Clone the desired ‘POST TEMPLATE‘ to create a new post:
- Hover the mouse over the desired ‘POST TEMPLATE’ name until a ‘Posts Menu’ appears below the name.
- Click on the ‘Clone’ link.
- A new ‘Draft’ copy of the template post will be created and displayed at the top of the posts.

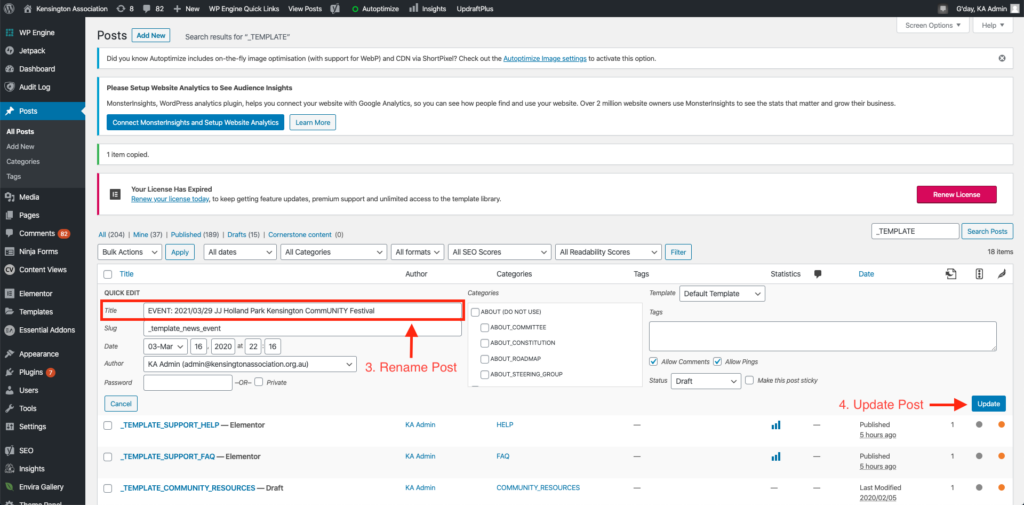
Renaming the new draft post based on the defined 'POST TEMPLATE STANDARDS'
Rename the newly created ‘Draft’ post based on the desired post type ‘POST TEMPLATE STANDARD’ naming convention:
- Identify the desired post type ‘POST TEMPLATE STANDARD’ naming convention name by matching the required post to the post type template name.
- Hover the mouse over the new ‘Draft’ post name until a ‘Posts Menu’ appears below the name.
- Click on the ‘Quick Edit’ link.
- Click the ‘Title’ textbox.
- Enter the new post name based on the ‘POST TEMPLATE STANDARD’ recommended nameing convention.
- Click the ‘Slug’ textbox.
- Copy and Paste the new post name from the ‘Title’ textbox into the ‘Slug’ textbox and replace the eixtsing slug.
- Click on the ‘Update’ button.
For Example: The ‘EVENTS’ post has the recommended naming convention of ‘EVENT: [YYYY/MM/DD] [LOCATION / SUBURB / STREET] [SHORT TITLE OF EVENT]‘ and an example would be ‘EVENT: 2020/03/29 JJ Holland Park Kensington CommUNITY Festival‘.

CONGRATULATIONS, you have now familiarised yourself with the KA Website Post Templates and Post Standards for naming them, how to manage, find, copy / clone a template post, and rename the new draft post.
Posts
Please Note: To complete these sections, you must have either ‘CONTRIBUTOR, AUTHOR, EDITOR or ADMINISTRATOR‘ access assigned to your user account. If you believe you should have these user account privileges, please contact your ‘WEBSITE ADMINISTRATOR’.
Managing Posts through the Dashboard Posts Screen
Navigate to the ‘Posts’ tab:
- Click the ‘Posts’ link on the right hand side panel.
Finding existing posts
Narrow down the posts list to only filter by the ‘POST TEMPLATES‘ posts:
- Click the ‘Search Posts’ textbox.
- Enter the search keyword, for example ‘EVENT’ to display all the posts with that keyword in the name or title.
- Click on the ‘Search Posts’ button.
- Identify the desired post.
Adding new posts
To add new posts:
Please Note: To save time when adding a new post, please remember to always ‘COPY / CLONE AN EXISTING POST‘ by ‘SELECTING THE POST YOU WISH TO COPY / CLONE‘ and to ‘COPY / CLONE‘ it.
- To create a new post from a ‘Template’ > Click this link for instructions on copying / cloning a ‘Post Template’
- First identify the ‘Post Template’ to use.
- Find the ‘Post Template’.
- Copy / Clone the ‘Post Template’.
- Rename the new draft version of the ‘Post Template’.
- To create a new post from an ‘Existing’ post > Click this link for instructions on copying / cloning an ‘Existing Post’
- First find the ‘Existing Post’ to use.
- Copy / Clone the ‘Existing Post’.
- Rename the new draft version of the ‘Existing Post’.
- The new post content is now ready to be edited.
Editing post content
To edit posts:
- Identify the post to edit.
- Hover the mouse over the post name until a ‘Posts Menu’ appears below the name.
- Click the ‘Edit With Elementor’ link.
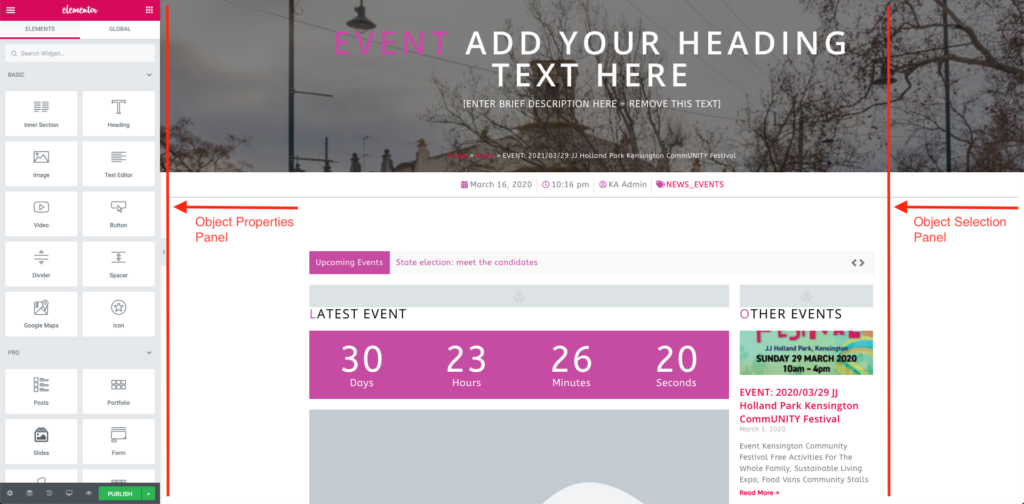
- You will now be taken to the ‘Elementor’ editor screen.

The ‘Elementor’ editor screen comprises of 2 sections which are described below.
- Right: Block Properties Section – Edit the properties of a block.
- Left: Block Selection and Display Section – Select and view the output of an edited block.
Understanding post Block content
Each post content is made up of a set of common ‘POST BLOCKS’ that you will need to edit. These ‘POST BLOCKS‘ also serve as means to maintain a ‘POST STANDARD‘ look and feel for your posts which will help users by providing a consistent and standardised format for them to view and interact with your posts, no matter which admin user creates them.
Below is a list of the common ‘POST BLOCK’ types and how to edit their specific sections. The available ‘POST BLOCKS’ include:
- Heading:
- Title & Subtitle
- Body:
- Countdown Timer
- Image
- Heading
- Text Editor
- Print Document Button
- Body Details (optional):
- Icon Box:
- Date & Time
- Organiser
- Category (optional)
- Address (optional)
- Website (optional)
- Map (optional)
- Icon Box:
- Footer (optional):
- Image Gallery
Editing Title & Subtitle block
To edit the block content:
- Identify the ‘Title & Subtitle’ block content to edit.
- Hover the mouse over the block content until a ‘Edit Icon’ appears at the top right-hand corner of the block.
- Click the ‘Edit Icon’ link.
- The ‘BLOCK PROPERTIES’ will be displayed in the ‘Block Properties Section’.
Enter the new block content values:
- Locate the ‘Title (First Part)’ textbox.
- Click the ‘Title (First Part)’ textbox.
- Enter the new value by selecting and replacing the old value.
- Locate the ‘Sub Text’ textbox.
- Click the ‘Sub Text’ textbox.
- Enter the new value by selecting and replacing the old value.
- The ‘BLOCK PROPERTIES’ will be update to display the new values in the ‘Block Display Section’.
Editing Countdown block
To edit the block content:
- Identify the ‘Countdown’ block content to edit.
- Hover the mouse over the block content until a ‘Edit Icon’ appears at the top right-hand corner of the block.
- Click the ‘Edit Icon’ link.
- The ‘BLOCK PROPERTIES’ will be displayed in the ‘Block Properties Section’.
Enter the new block content values:
- Locate the ‘Due Date’ textbox.
- Select the new date value
- Click the ‘Hour’ textbox
- Enter the new value by selecting and replacing the old value.
- Click the ‘Minute’ textbox
- Enter the new value by selecting and replacing the old value.
- Click the ‘AM/PM’ textbox.
- Switch the value to the desired new value.
- The ‘BLOCK PROPERTIES’ will be update to display the new values in the ‘Block Display Section’.
Editing Image block
To edit the block content:
- Identify the ‘Image’ block content to edit.
- Hover the mouse over the block content until a ‘Edit Icon’ appears at the top right-hand corner of the block.
- Click the ‘Edit Icon’ link.
- The ‘BLOCK PROPERTIES’ will be displayed in the ‘Block Properties Section’.
Select 1 new image to add to the image block content:
- Locate the ‘Choose Image’ imagebox.
- Hover the mouse over the imagebox until the ‘Choose Image’ button appears.
- Click the ‘Choose Image’ button, the ‘Insert Media’ screen will appear.
- To add a ‘New’ image:
- To ‘Drag and Drop’ media file from your computer or the internet:
- Navigate to the media file.
- Select the media file to add.
- Drag the media file over to the ‘Drop files to upload’ panel, the panel will turn ‘Blue’.
- Drop the media file into the ‘Drop files to upload’ panel.
- To use the ‘Select Files’ button to upload media file from your computer:
- Click the ‘Select Files’ button to open the ‘File Browser Screen’.
- Navigate to the folder of the media file.
- Select the media file.
- Click the ‘Open’ button.
- The media file will commence uploading and display a progress bar.
- Once the progress bar has completed, the media file are ready to use.
- To ‘Drag and Drop’ media file from your computer or the internet:
- To select an ‘Existing’ image:
- Click the ‘Media Library’ tab.
- Select the media file to add.
- Click the ‘Insert Media’ button.
- The ‘BLOCK PROPERTIES’ will be update to display the new values in the ‘Block Display Section’.
Editing Heading block
To edit the block content:
- Identify the ‘Heading’ block content to edit.
- Hover the mouse over the block content until a ‘Edit Icon’ appears at the top right-hand corner of the block.
- Click the ‘Edit Icon’ link.
- The ‘BLOCK PROPERTIES’ will be displayed in the ‘Block Properties Section’.
Enter the new block content values:
- Locate the ‘Title’ textbox.
- Click the ‘Title’ textbox.
- Enter the new value by selecting and replacing the old value.
- The ‘BLOCK PROPERTIES’ will be update to display the new values in the ‘Block Display Section’.
Editing Text Editor block
To edit the block content:
- Identify the ‘Text Editor’ block content to edit.
- Hover the mouse over the block content until a ‘Edit Icon’ appears at the top right-hand corner of the block.
- Click the ‘Edit Icon’ link.
- The ‘BLOCK PROPERTIES’ will be displayed in the ‘Block Properties Section’.
Enter the new block content values:
- Locate the ‘Editor’ textbox.
- Click the ‘Editor’ textbox.
- Enter the new value by selecting and replacing the old value.
- The ‘BLOCK PROPERTIES’ will be update to display the new values in the ‘Block Display Section’.
Editing Icon Box block
To edit the block content:
- Identify the ‘Icon Box’ block content to edit.
- Hover the mouse over the block content until a ‘Edit Icon’ appears at the top right-hand corner of the block.
- Click the ‘Edit Icon’ link.
- The ‘BLOCK PROPERTIES’ will be displayed in the ‘Block Properties Section’.
Enter the new block content values:
- Locate the ‘Description’ textbox.
- Click the ‘Description‘ textbox.
- Enter the new value by selecting and replacing the old value.
- The ‘BLOCK PROPERTIES’ will be update to display the new values in the ‘Block Display Section’.
Specific ‘Icon Box’ instructions:
- Adding a ‘Line Feed / Carriage Return Character’ to display text on multiple lines:
- Add the special characters to the text: <br>
- Examples:
- ‘Date & Time’ – December 2, 2019<br>7:30 pm – 9:30 pm
- ‘Address’ – Conference Room<br>Kensington Town Hall<br><br>Bellair Street<br>Kensington, 3031
- Adding a link within the text:
- Add the special characters to the text: <a target=”_blank” href=”[ENTER LINK ADDRESS]“>[ENTER LINK ADDRESS]</a>
- Examples:
- ‘Website’ – <a target=”_blank” href=”https://kensingtonassociation.org/“>https://kensingtonassociation.org/</a>
- Please ensure you test the link, by clicking on it, to ensure it works before publishing the page.
Editing Map block
To edit the block content:
- Identify the ‘Map’ block content to edit.
- Hover the mouse over the block content until a ‘Edit Icon’ appears at the top right-hand corner of the block.
- Click the ‘Edit Icon’ link.
- The ‘BLOCK PROPERTIES’ will be displayed in the ‘Block Properties Section’.
Enter the new block content values:
- Locate the ‘Location’ textbox.
- Click the ‘Location‘ textbox.
- Enter the new location address by selecting and replacing the old location address.
- The ‘BLOCK PROPERTIES’ will be update to display the new values in the ‘Block Display Section’.
Editing Image Gallery block
To edit the block content:
- Identify the ‘Image Gallery’ block content to edit.
- Hover the mouse over the block content until a ‘Edit Icon’ appears at the top right-hand corner of the block.
- Click the ‘Edit Icon’ link.
- The ‘BLOCK PROPERTIES’ will be displayed in the ‘Block Properties Section’.
Select 3 new images to add to the gallery block content:
- Locate the ‘Image Gallery’ imagebox.
- To add ‘New’ image(s):
- To ‘Drag and Drop’ media file(s) from your computer or the internet:
- Navigate to the media file(s).
- Select the media file(s) to add.
- Drag the media file(s) over to the ‘Create Gallery’ panel, the panel will turn ‘Blue’.
- Drop the media file(s) into the ‘Create Gallery’ panel.
- To use the ‘Select Files’ button to upload media file(s) from your computer:
- Click the ‘Upload Files’ tab.
- Click the ‘Select Files’ button to open the ‘File Browser Screen’.
- Navigate to the folder of the media file(s).
- Select the media file(s).
- Click the ‘Open’ button.
- The media file(s) will commence uploading and display a progress bar.
- Once the progress bar has completed, the media file(s) are ready to use.
- To ‘Drag and Drop’ media file(s) from your computer or the internet:
- To select ‘Existing’ image(s):
- Click the ‘Media Library’ tab.
- Select the media file(s) to add.
- Click the ‘Create A New Gallery’ button.
- The ‘BLOCK PROPERTIES’ will be update to display the new values in the ‘Block Display Section.
Uploading File(s) to Google Drive
Please Note: To add a ‘SHAREABLE LINK‘ to the ‘PRINT DOCUMENT BUTTON‘, please remember to upload the desired file(s) to the ‘CORRESPONDING GOOGLE DRIVE FOLDER FIRST‘, then proceed to create a ‘SHAREABLE LINK‘.
Navigate to the ‘KA Google Drive’ using the following link:
- Click or copy and paste the link into the browser address bar:
- Click the ‘Go To Drive’ button.
- Enter your KA Gmail credentials (KA email address and password provided to you).
- Click the ‘Log In’ button.
- Once logged in, you will be presented with the ‘KA Google Drive’ screen.

Navigate to the desired ‘KA Google Drive Folder’:
- Navigate to the desired ‘Google Drive Folder’:
- Example: ‘My Drive > KA Inc > 01. MANAGEMENT > 202005’.


Upload a file to the desired ‘KA Google Drive Folder’:
- Right-Click on any empty space while on the folder until a ‘Context Menu’ appears.
- Click on the ‘Upload files’ menu item.
- You will be presented with a ‘File Browser’ screen.
- Navigate to the desired ‘Directory’ that contains the ‘File’ you wish to upload.
- Click on the desired ‘File’.
- Click the ‘Open’ button.
- You will be presented with a ‘Uploading…’ pop-up screen indicating that the ‘File’ is currently being uploaded.
- Please Note: Do not close this pop-up screen until the desired ‘File(s)’ have completed uploading or it will interrupt and cancel your ‘File(s)’ upload process and you will need to re-start the ‘Upload’ process again.
- Once the ‘File(s)’ have been successfully uploaded, you will be presented with a ‘…Upload Completed’ pop-up screen indicating that the ‘File’ was uploaded correctly.
- You can now see your newly uploaded ‘File(s)’ in the ‘Google Drive Folder’.


CONGRATULATIONS, you have now upload your ‘File(s)’ into the KA Google Drive.
Creating A Shareable Link From An Uploaded Google Drive File
Please Note: To add a ‘SHAREABLE LINK‘ to the ‘PRINT DOCUMENT BUTTON‘, please remember to upload the desired file(s) to the ‘CORRESPONDING GOOGLE DRIVE FOLDER FIRST‘, then proceed to create a ‘SHAERABLE LINK‘.
Navigate to the desired ‘KA Google Drive Folder’:
- Navigate to the desired ‘Google Drive Folder’:
- Example: ‘My Drive > KA Inc > 01. MANAGEMENT > 202005’.

Create a ‘Shareable Link’:
- Right-Click on the desired ‘File’ you wish to get a ‘Shareable Link’ for until a ‘Context Menu’ appears.
- Example: ‘MINUTES: 20200501-KA Meeting Minutes.docx’.
- Click on the ‘Share’ menu item.
- You will be presented with a ‘Share’ screen.
- Click on the ‘Get link’ option.
- Click on the ‘Copy link’ button to copy the created link to your clipboard.
- Click on the ‘Done’ button.


CONGRATULATIONS, you have now created a ‘Shareable Link’ and it is ready to be copied and pasted into you desired destination.
- Example: Add the ‘Shareable Link’ to a ‘Print Document’ button block content.
Editing Print Document Button block
Please Note: To add a ‘SHAREABLE LINK‘ to the ‘PRINT DOCUMENT BUTTON‘, please remember to upload the desired file(s) to the ‘CORRESPONDING GOOGLE DRIVE FOLDER FIRST‘, then proceed to create a ‘SHAREABLE LINK‘.
To edit the block content:
- Upload the desired file to the ‘Google Drive Folder’ > Click this link for instructions on uploading a ‘File(s)’.
- Create a ‘Shareable Link’ to the newly uploaded ‘Google Drive File’ > Click this link for instructions on creating a ‘Shareable Link’.
- Navigate to the desired post to add the new ‘Shareable Link’ to.
- Identify the ‘Print Document Button’ block content to edit.
- Please Note: All ‘Post Templates’ will have two ‘PRINT DOCUMENT BUTTONS’:
- In the ‘Header’ section of the ‘Post Template’, and
- In the ‘Footer’ section of the ‘Post Template’.
- Make sure you update both ‘PRINT DOCUMENT BUTTONS’.
- Please Note: All ‘Post Templates’ will have two ‘PRINT DOCUMENT BUTTONS’:
- Hover the mouse over the block content until a ‘Edit Icon’ appears at the top right-hand corner of the block.
- Click the ‘Edit Icon’ link.
- The ‘BLOCK PROPERTIES’ will be displayed in the ‘Block Properties Section’.
Enter the new block content values:
- Locate the ‘Link’ textbox.
- Click the ‘Link’ textbox.
- Enter the new value by selecting and replacing the old value.
- The ‘BLOCK PROPERTIES’ will be update to display the new values in the ‘Block Display Section’.
Previewing posts
Preview the newly created / exiting post internal sections:
- Click on the ‘Eye’ icon.
- A new web browser window will open and the ‘Preview’ screen will be displayed.


Preview the newly created /existing post internal sections based on ‘Desktop’, ‘Tablet, and ‘Mobile’ device to see how the post will look and feel on the different devices:
- Click on the ‘monitor’ icon.
- Click on the desired ‘mode’ icon.
- The ‘Object Selection Window’ will change in size to match the device size selected.


Publishing posts
Save and publish the newly created post internal sections:
- Click on the ‘PUBLISH’ button.
- The newly created post will be ‘PUBLISHED’ and a ‘Success Message’ will display from which you can also ‘Preview’ the ‘LIVE’ post.


Saving posts
Save and publish an existing post internal sections:
- Click on the ‘UPDATE’ button.
- The existing post will be ‘UPDATE’ and the changes will now be ‘LIVE’.

Saving posts as drafts
Save a newly created / existing post internal sections and remove it from being ‘LIVE’:
- Click on the ‘SAVE OPTIONS’ button.
- Click on the ‘Save Draft’ icon.
- The newly created / existing post will be removed from being ‘LIVE’ and saved back to a ‘DRAFT’ post.


Exiting posts editor Screen
Exiting the editing of the newly created / exiting post internal sections:
- Click on the ‘Hamburger’ icon.
- Click on the ‘Exit to Dashboard’ button.


Once exited, you will be presented with the ‘Post Editing Theme Options’ screen. To navigate back to the ‘Posts’ tab:
- Click the ‘Posts’ link on the right hand side panel.

Adding featured image to posts
Edit the newly created / existing post:
- Hover the mouse over the desired ‘Post’ name until a ‘Posts Menu’ appears below the name.
- Click on the ‘Edit’ link.
- The ‘Post Editing Theme Options’ screen will appear.
Add a featured image to a newly created / existing post:
- Locate the ‘Featured Image’ section on the right-hand ‘BLOCK PROPERTIES’.
- Click the ‘Featured Image’ section to expand it, if not already.
- Click the ‘Replace Image’ button to replace an existing image or the ‘Set Featured Image’ button to set a ‘New’ image, the ‘Featured Image’ screen will appear.
- To add a ‘New’ image:
- To ‘Drag and Drop’ media file from your computer or the internet:
- Navigate to the media file.
- Select the media file to add.
- Drag the media file over to the ‘Drop files to upload’ panel, the panel will turn ‘Blue’.
- Drop the media file into the ‘Drop files to upload’ panel.
- To use the ‘Select Files’ button to upload media file from your computer:
- Click the ‘Select Files’ button to open the ‘File Browser Screen’.
- Navigate to the folder of the media file.
- Select the media file.
- Click the ‘Open’ button.
- The media file will commence uploading and display a progress bar.
- Once the progress bar has completed, the media file are ready to use.
- To ‘Drag and Drop’ media file from your computer or the internet:
- To select an ‘Existing’ image:
- Click the ‘Media Library’ tab.
- Select the media file to add.
- Click the ‘Set Featured Image’ button.
- The ‘BLOCK PROPERTIES’ will be update to display the new values in the ‘Featured Image’ section.
Trashing posts
Delete a newly created / existing post and move it to the Trash folder:
- Hover the mouse over the desired ‘Post’ name until a ‘Posts Menu’ appears below the name.
- Click on the ‘Trash’ link.
- The new / existing post will be moved to the ‘Trash’ folder of the posts.
Please Note: The new / existing ‘Post’ has only been moved to the trash and not deleted. It will be permanently deleted in the next step.


Deleting posts
Delete a newly created / existing post permanently:
- PLEASE PROCEED WITH CAUTION IN THIS NEXT STEP! SELECT ONLY THE DESIRED POSTS TO DELETE!
- Click on the ‘Trash’ folder of the posts.
- Hover the mouse over the desired ‘Post’ name until a ‘Posts Menu’ appears below the name.
- Click on the ‘Delete Permanently’ link.
- The new / existing post will be ‘DELETED PERMANENTLY‘ from the ‘Trash’ folder of the posts.
Please Note: Completing this step will mean deleting the new / existing ‘Post’ permanently. It will not be retrievable unless an overnight backup was successfully completed previously.


CONGRATULATIONS, you have now familiarised yourself with the KA Website posts, how to manage, find, add new posts, edit posts content, preview, publish posts, save, save as draft, exit the editor screen, add a cover / featured image, sent a post to the trash and permanetly delete existing posts and their content.
Maintenance
In this guide, we will walk you through on how to manage the KA website comments and forms, apply updates, and manage users.
Please Note: To complete these sections, you must have ‘ADMINISTRATOR‘ access assigned to your user account. If you believe you should have these user account privileges, please contact your ‘WEBSITE ADMINISTRATOR’.
Site Maintenance
Please Note: To complete these sections, you must have ‘ADMINISTRATOR‘ user privileges assigned to your user account. If you believe you should have these user account privileges, please contact your ‘WEBSITE ADMINISTRATOR’.
Managing Comments through the Dashboard Comments Screen
Navigate to the ‘Comments’ tab:
- Click the ‘Comments’ link on the right hand side panel.
Finding Comments
To find existing comments:
- Click the ‘Search Comments’ textbox.
- Enter ‘Keyword(s)’ related to the comment title or name to find them.
- Click the ‘Search Comments’ button.
- The relevant comments will be display.
- Adjust ‘Keyword(s)’ until you find your desired comments.
Reviewing Comments
To review comments:
- Scroll through the comment list and review / read each comment.
- To ‘Approve / Unapprove’ a comment:
- Hover the mouse over the desired ‘Comment’ name until a ‘Comment Menu’ appears below the name.
- Click the ‘Approve / Unapprove’ link.
- The comment will be approved or unapproved.
- To ‘Reply’ to a comment:
- Hover the mouse over the desired ‘Comment’ name until a ‘Comment Menu’ appears below the name.
- Click the ‘Reply’ link, to open the ‘Reply’ panel.
- Review and reply to the comment.
- Click the ‘Approve And Reply’ button, to approve and reply to the comment.
- The comment will be approved and your reply sent and the ‘Reply’ panel will close.
- To mark a comment as ‘Spam’:
- Hover the mouse over the desired ‘Comment’ name until a ‘Comment Menu’ appears below the name.
- Click the ‘Spam’ link.
- The comment will be moved to the ‘Spam’ folder.
- To ‘Delete Permanently’ a spammed comment:
- Click the ‘Spam’ folder, to display the comments in spam.
- Hover the mouse over the desired ‘Comment’ name until a ‘Comment Menu’ appears below the name.
- Click the ‘Delete Permanently’ link.
- Confirm you want to permanently delete the comment.
- The comment will be permanently deleted and will no longer be visible.
- To mark a comment as ‘Not Spam’:
- Click the ‘Spam’ folder, to display the comments in spam.
- Hover the mouse over the desired ‘Comment’ name until a ‘Comment Menu’ appears below the name.
- Click the ‘Not Spam’ link.
- The comment will be moved back to the ‘Pending / Approved’ folder, depending on its status as ‘Approved / No Approved’.
Deleting Comments
To delete comments:
Please Note: Before DELETING ANY COMMENT, please ensure they are not currently needed. Once comments have been permanently delete, they cannot be retrieved.
- To ‘Trash’ a comment:
- Hover the mouse over the desired ‘Comment’ name until a ‘Comment Menu’ appears below the name.
- Click the ‘Trash’ link.
- The comment will be moved to the ‘Trash’ folder.
- To ‘Delete Permanently’ a comment:
- Click the ‘Trash’ folder, to display the comments in trash.
- Hover the mouse over the desired ‘Comment’ name until a ‘Comment Menu’ appears below the name.
- Click the ‘Delete Permanently’ link.
- Confirm you want to permanently delete the comment.
- The comment will be permanently deleted and will no longer be visible.
- To ‘Restore’ a comment:
- Click the ‘Trash’ folder, to display the comments in trash.
- Hover the mouse over the desired ‘Comment’ name until a ‘Comment Menu’ appears below the name.
- Click the ‘Restore’ link.
- The comment will be moved back to the ‘Pending / Approved’ folder, depending on its status as ‘Approved / No Approved’.
CONGRATULATIONS, you have now familiarised yourself with the KA Website Comments, how to manage, find, review, mark as spam, and delete comments.
NA - Managing Form Entries through the Dashboard Forms Screen
Navigate to the ‘Ninja Forms’ tab:
- Click the ‘Ninja Forms’ link on the right hand side panel.
- Click the ‘Submissions’ link on the right hand side panel, the ‘Submissions’ screen will appear
- Select the relevant form from the ‘Select Form’ drop down list to display the entries for that form.
NA - Finding Form Entries
To find existing forms and form entries:
- To ‘Search’ form entries by keyword(s):
- Click the ‘Search Item’ textbox.
- Enter ‘Keyword(s)’ related to the form entries title or name to find them.
- Click the ‘Search Item’ button.
- The relevant form entries will be display.
- Adjust ‘Keyword(s)’ until you find your desired form entries.
- To ‘Filter’ form entries by date:
- Click the ‘Begin Date’ textbox (optional).
- Select the ‘Begin Date’ to search from (optional).
- Click the ‘End Date’ textbox (optional).
- Select the ‘End Date’ to search from.
- Click the ‘Filter’ button.
- The relevant form entries will be display.
- Adjust ‘Begin Date’ and ‘End Date’ until you find your desired form entries.
NA - Reviewing Form Entries
To review form entries:
- Hover the mouse over the desired ‘Form Entry’ name until a ‘Form Entry Menu’ appears below the name.
- Click the ‘Edit’ link.
- Review and edit the form entry.
- Click the ‘Update’ button, to save the updated entry.
- The form entry will be saved and the ‘Submissions’ screen will appear.
NA - Deleting Form Entries
To delete form entries:
Please Note: Before DELETING ANY FORM ENTRY, please ensure they are not currently needed. Once Form Entries have been permanently delete, they cannot be retrieved.
- To ‘Trash’ a form entry:
- Hover the mouse over the desired ‘Form Entry’ name until a ‘Form Entry Menu’ appears below the name.
- Click the ‘Trash’ link.
- The form entry will be moved to the ‘Trash’ folder.
- To ‘Delete Permanently’ a form entry:
- Click the ‘Trash’ folder, to display the form entries in trash.
- Hover the mouse over the desired ‘Form Entry’ name until a ‘Form Entry Menu’ appears below the name.
- Click the ‘Delete Permanently’ link.
- Confirm you want to permanently delete the form entry.
- The form entry will be permanently deleted and will no longer be visible.
- To ‘Restore’ a form entry:
- Click the ‘Trash’ folder, to display the form entries in trash.
- Hover the mouse over the desired ‘Form Entry’ name until a ‘Form Entry Menu’ appears below the name.
- Click the ‘Restore’ link.
- The form entry will be moved back to the ‘Completed’ folder.
CONGRATULATIONS, you have now familiarised yourself with the KA Website Form Entries, how to manage, find, review and delete form entries.
Site Updates
Please Note: To complete these sections, you must have ‘ADMINISTRATOR‘ user privileges assigned to your user account. If you believe you should have these user account privileges, please contact your ‘WEBSITE ADMINISTRATOR’.
Managing Plugins through the Dashboard Updates Screen
Navigate to the ‘Dashboard’ tab:
- Click the ‘Dashboard’ link on the right hand side panel.
- Click the ‘Updates’ link on the right hand side panel, the ‘Updates’ screen will appear.
Updating Plugins
To update existing plugins:
Please Note: Plugins whose LICENSE HAVE EXPIRED cannot be updated and will need to be renewed before the can be updated.
- Scroll down to the ‘Plugins’ section.
- Click the ‘Update Plugins’ button, the ‘Update’ panel will appear.
- The plugins will start to automatically update.
- PLEASE WAIT FOR THE PLUGINS TO COMPLETE THE UPDATE PROCESS. DO NOT PRESS REFRESH, BACK OR PREVIOUS BUTTONS ON YOUR BROWSER DURING THIS PERIOD.
- Once completed the ‘Plugins’ section will be cleared and display only outstanding plugins that could not be updated.
PLEASE CONTACT YOUR ‘WEBSITE ADMINISTRATOR’ IF YOU HAVE ANY PROBLEMS UPDATING PLUGINS.
CONGRATULATIONS, you have now familiarised yourself with the KA Website Updates, how to manage, and update plugins.
Managing Themes through the Dashboard Updates Screen
Navigate to the ‘Dashboard’ tab:
- Click the ‘Dashboard’ link on the right hand side panel.
- Click the ‘Updates’ link on the right hand side panel, the ‘Updates’ screen will appear.
Updating Themes
To update existing themes:
Please Note: Themes whose LICENSE HAVE EXPIRED cannot be updated and will need to be renewed before the can be updated.
- Scroll down to the ‘Themes’ section.
- Click the ‘Update Themes’ button, the ‘Update’ panel will appear.
- The themes will start to automatically update.
- PLEASE WAIT FOR THE THEMES TO COMPLETE THE UPDATE PROCESS. DO NOT PRESS REFRESH, BACK OR PREVIOUS BUTTONS ON YOUR BROWSER DURING THIS PERIOD.
- Once completed the ‘Themes’ section will be cleared and display only outstanding themes that could not be updated.
PLEASE CONTACT YOUR ‘WEBSITE ADMINISTRATOR’ IF YOU HAVE ANY PROBLEMS UPDATING THEMES.
CONGRATULATIONS, you have now familiarised yourself with the KA Website Updates, how to manage, and update themes.
Have A Question?
Have an enquiry or simply want to get in touch, please click on the button below to drop us a message and someone will be in touch soon…